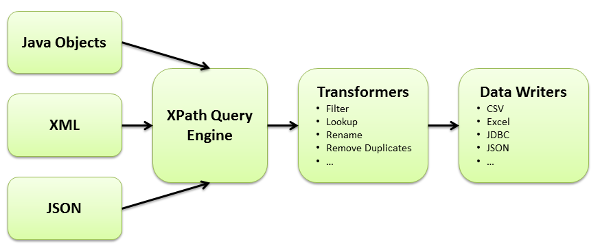
 Data Pipeline’s query engine allows you to use XPath to query XML, JSON, and Java objects. This walkthrough will show you how to query Java objects using XPath and save the results to a CSV file. While the reading and writing will be done with the JavaBeanReader and CSVWriter classes, you can swap out the CSVWriter for any other endpoint or transformation that Data Pipeline supports.
Java object model
The object model used as input is an ArrayList of Java beans called Signal. The Signal class has a variety of private fields, along with their corresponding getter and setter methods.
|
1 2 3 4 5 6 7 8 9 10 11 12 13 14 15 16 17 18 19 20 21 22 23 24 25 |
public class Signal { private String source; private String name; private String component; private int occurrence; private int size; private float bandwidth; private int sizewithHeader; private float bandwidthWithHeader; public Signal() { } public String getSource() { return source; } public void setSource(String source) { this.source = source; } ... } |
The XPath engine doesn’t require any change to read your classes — no interfaces to implement and no special annotations. The only restriction is that your model needs to be some combination of:
- Java beans
- Arrays
- Collections (anything implementing java.lang.Iterable)
- Maps
All other types, including strings, dates, primitives, boxed types, etc., are treated as single-valued types (leaves, instead of branch nodes).
Resulting CSV file
The transfer job will create a CSV file named output.csv with the following contents.
|
1 2 3 |
source,name,component,occurrence,size,bandwidth,sizewithHeader,bandwidthWithHeader TestSource1,TestName1,TestComponent1,1,1,1.0,1,1.0 TestSource2,TestName2,TestComponent2,2,2,2.0,2,2.0 |
Data Pipeline code
Now once you have your object model and decided on the output format (CSV in this case), it’s time to write the Data Pipeline job code.
|
1 2 3 4 5 6 7 8 9 10 11 12 13 14 15 16 17 18 19 20 21 22 23 24 25 26 27 28 29 30 31 32 33 34 35 36 37 38 39 40 41 42 43 |
import java.io.File; import java.util.ArrayList; import java.util.List; import com.northconcepts.datapipeline.core.DataWriter; import com.northconcepts.datapipeline.csv.CSVWriter; import com.northconcepts.datapipeline.javabean.JavaBeanReader; import com.northconcepts.datapipeline.job.JobTemplate; public class WriteJavaObjectToCsv { public static void main(String[] args) { List<Signal> messages = getTestData(); JavaBeanReader reader = new JavaBeanReader("messages", messages); reader.addField("source", "//source"); reader.addField("name", "//name"); reader.addField("component", "//component"); reader.addField("occurrence", "//occurrence"); reader.addField("size", "//size"); reader.addField("bandwidth", "//bandwidth"); reader.addField("sizewithHeader", "//sizewithHeader"); reader.addField("bandwidthWithHeader", "//bandwidthWithHeader"); reader.addRecordBreak("//Signal"); DataWriter writer = new CSVWriter(new File("example/data/output/output.csv")); JobTemplate.DEFAULT.transfer(reader, writer); } private static List<Signal> getTestData() { List<Signal> messages = new ArrayList<Signal>(); messages.add(new Signal("TestSource1", "TestName1", "TestComponent1", 1, 1, 1.0f, 1, 1.0f)); messages.add(new Signal("TestSource2", "TestName2", "TestComponent2", 2, 2, 2.0f, 2, 2.0f)); return messages; } } |
There are basically only three parts to the above code.
1. Create your JavaBeanReader
Instantiate a new JavaBeanReader with your arbitrary document/root name and your object model.
|
1 2 |
List<Signal> messages = getTestData(); JavaBeanReader reader = new JavaBeanReader("messages", messages); |
Think of the "messages" param as the root node in an XML document. It can be used as part of your XPath query if needed: /messages//source.
The second param — your input object model — can be any of the types previously mentioned: array, collection, Java bean, etc.
2. Specify your fields and record breaks
Use the addField and addRecordBreak methods to tell the JavaBeanReader how to create records from your object model.
|
1 2 3 4 5 6 7 8 9 10 |
reader.addField("source", "//source"); reader.addField("name", "//name"); reader.addField("component", "//component"); reader.addField("occurrence", "//occurrence"); reader.addField("size", "//size"); reader.addField("bandwidth", "//bandwidth"); reader.addField("sizewithHeader", "//sizewithHeader"); reader.addField("bandwidthWithHeader", "//bandwidthWithHeader"); reader.addRecordBreak("//Signal"); |
The addField method takes the name of the new, target field and an XPath 1.0 location path to identify each field of the record.
The addRecordBreak method takes another XPath 1.0 location path to identify each record’s boundary. The reader returns a new record whenever this pattern is matched. The returned record contains all fields (from addField matches) that have been captured up to that point.
3. Run the job
Create the desired target DataWriter and run the reader-to-writer transfer.
|
1 2 3 |
DataWriter writer = new CSVWriter(new File("example/data/output/output.csv")); JobTemplate.DEFAULT.transfer(reader, writer); |
At this point, you can replace the CSVWriter with another DataWriter to produce a different output format. Here are several other examples of endpoints you can use:
- Write to database using JDBC
- Write to a Microsoft Excel file
- Write to a fixed-width / fixed-length record file
- Write HTML using FreeMarker templates
- Write XML
- Write JSON
XPath queries
The XPath 1.0 location paths used in the addField and addRecordBreak methods are a subset of the full spec.
This limitation is primarily due to Data Pipeline being built to stream data. To ensure the XML and JSON parsers run with low memory overhead, only forward matching, XPath expression are supported. You can see the list of supported expression on JavaBeanReader’s Javadoc.
Download Data Pipeline
The Data Pipeline library, including the online examples, are available for immediate download. Once you have it, see the getting started guide to start running the examples.

Pingback: Convert Java Objects to String With the Iterator Pattern